Javascript(jQuery)」カテゴリーアーカイブ

jQuery Glide.js スライドショー

ここではjQueryプラグインGlide.jsについて解説しています。

glide

ダウンロードはこちら
http://jedrzejchalubek.com/glide/

head

<link rel="stylesheet" href="style.css" />
<script src="//ajax.googleapis.com/ajax/libs/jquery/1.11.1/jquery.min.js"></script>
<script src="jquery.glide.js"></script>

読み込むファイルはjquery.glide.jsとstyle.cssです。

body

<div class="slider">
    <ul class="slider__wrapper">
        <li class="slider__item"><img src="img1.jpg" /></li>
        <li class="slider__item"><img src="img2.jpg" /></li>
    </ul>
</div>

script

$('.slider').glide({
    arrowLeftText: '',        // 左にスライドさせる文字列
    arrowRightText: '',       // 右にスライドさせる文字列
    arrows: true,             // 左右切り替えの表示
    navigation: false,        // ナビゲーションの表示
    animationDuration: 1500,  // スライドの速度
    autoplay: 4000,           // スライドの感覚
    hoverpause: false         // マウスオーバーでスライドを止めるか
});

左右の切り替えを画像にする

style.css

.slider__arrows-item--right {
  background: url(glide-arrows-right.png) no-repeat; /* 追加 */
  bottom: 50%;
  right: 30px;
}
.slider__arrows-item--left {
  background: url(glide-arrows-left.png) no-repeat; /* 追加 */
  bottom: 50%;
  left: 30px;
}

style.cssの上記の箇所で左右切り替えを設定しているのでbackgroundで画像を設定し、
scriptの文字列は空白を指定しています。

関連記事
jQuery Camera 画像スライドショー
https://office-goto.info/javascript-jquery/camera/

jQuery セレクタ

ここではjQueryのセレクタについて解説しています。

id

$("#id")

class

$(".class")

タグ

$("p")

タグとidやclass

$("p#id_p")
$("p.class_p")

name

$('[name="name1"]')

aタグのhref

$("a[href]")

aタグのhrefをidで指定

$("a[href = '#id']")

imgタグのsrcを取得

var src = $("#img_id").attr('src'); 
var src = $(".img_class").attr('src'); 

aタグのhrefを取得

var href = $("#a_id").attr('href'); 
var href = $(".a_class").attr('href'); 

jQuery UI datepicker 日本語 カレンダー

ここではjQuery UI datepickerの日本語カレンダーを実装する方法を解説しています。

calendar

head

<link rel="stylesheet" href="//code.jquery.com/ui/1.10.4/themes/flick/jquery-ui.css" />
<script src="//ajax.googleapis.com/ajax/libs/jquery/1.11.0/jquery.min.js"></script>
<script src="//ajax.googleapis.com/ajax/libs/jqueryui/1.10.4/jquery-ui.min.js"></script>
<script src="//ajax.googleapis.com/ajax/libs/jqueryui/1.10.4/i18n/jquery.ui.datepicker-ja.js"></script>

CSSの選択
http://jqueryui.com/themeroller/

CSSはお好みのものをこちらから選択できます。
左側のメニューからGalleryから選択してください。
今回の例ではflickのCSSを選択しています。

読み込むCSSの変更
UI darknessを選択した場合

<link rel="stylesheet" href="//code.jquery.com/ui/1.10.4/themes/ui-darkness/jquery-ui.css" />

このように読み込むCSSをお好みに合わせて変更してください。

jqueryとjqueryUIはGoogleから読み込んでいます。
https://developers.google.com/speed/libraries/devguide?hl=ja

日本語化
日本語化をするには、4行目の

<script src="//ajax.googleapis.com/ajax/libs/jqueryui/1.10.4/i18n/jquery.ui.datepicker-ja.js"></script>

を記述します。

日本語化した場合のレイアウトのずれを修正

<style type="text/css">
    .ui-datepicker select.ui-datepicker-month,
    .ui-datepicker select.ui-datepicker-year {
        width:auto;
    }
</style>

日本語化した場合横幅が足りなくなってレイアウトが崩れてしまうので修正しています。

Script

$(function() {
    $("#datepicker").datepicker({
        changeMonth: true,
        changeYear: true
    });
});

年と月をセレクトボックスに表示させています。

html

<input type="text" id="datepicker" />

Scriptで指定したエレメントと同じものを指定します。

これでテキストフィールドをクリックしたときにカレンダーを表示させることができます。

jQuery チェックボックス全選択、解除

ここではjQueryでチェックボックスを全選択、解除する方法を解説しています。

Script

$(function() {
    $('#all').click(function() {
        if (this.checked) {
            $('[name="deleteId[]"]').prop('checked', $(this).is(':checked'));
        }
        else {
            $('[name="deleteId[]"]').removeAttr('checked');
        }
    });
});

html

<form action="<?php echo $_SERVER['PHP_SELF'];?>" name="checktest" id="checktest" method="post">
<input type="checkbox" id="all">全選択/全解除<br />
<input type="checkbox" name="deleteId[]" id="deleteId" value="1"><br />
<input type="checkbox" name="deleteId[]" id="deleteId" value="2"><br />
<input type="checkbox" name="deleteId[]" id="deleteId" value="3"><br />
</form>

解説
「this.checked」と記述するとセレクタで指定したチェックボックスが選択されているかがわかるので、処理を分けています。

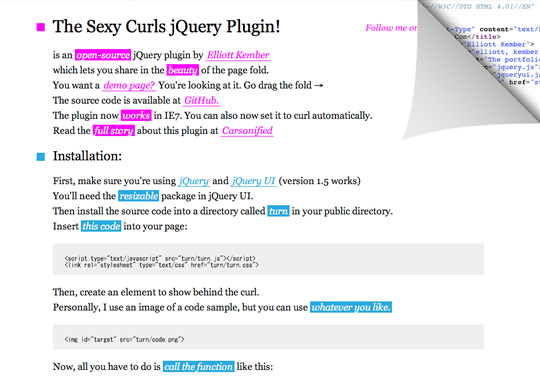
jQuery The Sexy Curlsでページめくり

ここではThe Sexy Curlsプラグインの紹介をしています。

sexy-curls

ダウンロードはこちら
http://elliottkember.com/sexy_curls.html

headで読み込み

<script src="jquery.min.js"></script>
<script src="jquery-ui.min.js"></script>
<script src="turn.js"></script>
<link rel="stylesheet" href="turn.css">

使用するファイル
jquery.min.js
jquery-ui.min.js
turn.js
turn.css
必要な画像
後は削除しても大丈夫です。

script

$(document).ready(function(){
    $('#target').fold();
});

html

<img id="target" src="yellow-heart.jpg" />

めくれたときに表示する画像を指定してください。

turn.js

var defaults = {
    directory: '.',         // The directory we're in
    side: 'left',           // change me to "right" if you want rightness
    turnImage: 'fold.png',  // The triangle-shaped fold image
    maxHeight: 400,         // The maximum height. Duh.
    startingWidth: 80,      // The height and width 
    startingHeight: 80,     // with which to start (these should probably be camelCase, d'oh.)
    autoCurl: false         // If this is set to true, the fold will curl/uncurl on mouseover/mouseout.
};

デフォルトではこのようになっていますので左上がめくれる設定になっています。

右上をめくれるようにする

var defaults = {
    directory: '.',            // The directory we're in
    side: 'right',             // change me to "right" if you want rightness
    turnImage: 'fold-sw.png',  // The triangle-shaped fold image
    maxHeight: 400,            // The maximum height. Duh.
    startingWidth: 80,         // The height and width 
    startingHeight: 80,        // with which to start (these should probably be camelCase, d'oh.)
    autoCurl: false            // If this is set to true, the fold will curl/uncurl on mouseover/mouseout.
};

めくる最初の位置とめくれる位置はmaxHeight、startingWidth、startingHeightのパラメータで決定してください。