PHP」カテゴリーアーカイブ

PHP Simple HTML DOM Parserでhtml要素の取得

ここではhtml要素をjQueryのように取得してくれるPHP Simple HTML DOM Parserの紹介をしていきます。

PHP Simple HTML DOM Parserをダウンロード
http://simplehtmldom.sourceforge.net/

サンプルソース

<?php
  
    require_once('simple_html_dom.php');
  
    // html読み込み
    $html = str_get_html('<html><body>Hello World</body></html>');
     
    // URLから読み込み
    $html = file_get_html('http://example.com');
     
    // ファイルから読み込み
    $html = file_get_html('sample.html');
     
    // body内0番目のaタグ内を取得
    $value = $html->find('body a', 0)->innertext;
     
    // body内0番目のaタグごと取得
    $value = $html->find('body a', 0)->outertext;
     
    // body内0番目のaタグhref属性を取得
    $value = $html->find('body a', 0)->href;
     
    // 全てのaタグを配列で取得
    $data = $html->find('body a');
    $value = $data[0]->innertext;
     
    // idやclassなどでも指定
    $data = $html->find('#foo');
    $data = $html->find('.bar');
     
    // メモリリークを回避
    $html->clear();

解説

$html = str_get_html(); (6行目)
htmlを読み込みます。

$html = file_get_html(‘http://example.com’); (9行目)
URLからも読み込めます。

$html = file_get_html(‘sample.html’); (12行目)
ファイルからも読み込めます。

$value = $html->find(‘body a’, 0)->innertext; (15行目)
findでjQueryのようにタグ内の要素を取得することが出来ます。

$value = $html->find(‘body a’, 0)->outertext; (18行目)
outertextとすることで、タグを含めた取得も出来ます。

$value = $html->find(‘body a’, 0)->href; (21行目)
hrefと指定することで、aタグ、href要素を指定することも出来ます。

$data = $html->find(‘body a’); (24行目)
->find(‘body a’);と指定することでaタグの要素を全て配列で取得することができます。

$data = $html->find(‘#foo’); (28、29行目)
idやclassなどのターゲットで指定することも出来ます。

$html->clear(); (32行目)
htmlを生成しすぎるとメモリリークに陥ってしまうので、コールしてください。

画像読み込みのサンプルソース

<?php
  
    require_once('simple_html_dom.php');
     
    // URLから読み込み
    $html = file_get_html('http://example.com');
     
    $value = $html->find('body img', 0)->src;
    $data = file_get_contents($value);
    file_put_contents('dl.jpg', $data);

少し応用をすれば画像ファイルも取り込むことができます。

php.ini my.ini設定

ここでは私がよくやるphp.iniとmy.iniの設定についてまとめています。

xampp

php.ini

error_reporting = E_ALL & ~E_STRICT
  
memory_limit =1000M
post_max_size =1000M
upload_max_filesize =1000M
  
mbstring.internal_encoding = UTF-8
mbstring.http_output = UTF-8
mbstring.encoding_translation = On
  
zend_extension = "D:\xampp\php\ext\php_xdebug.dll"
xdebug.remote_enable = 1
  
date.timezone = Asia/Tokyo

my.ini

[mysqld]
character-set-server = utf8
collation-server = utf8_general_ci
init-connect = SET NAMES utf8
#default-character-set = utf8
  
[mysqldump]
default-character-set = utf8
  
[mysql]
default-character-set = utf8

文字コードはUTF-8でデバッグにはXdebugを使用しています。

PHP ランダムに確立指定する

ここではPHP rand();関数に確立を設定するサンプルソースを記載しています。

サンプルソース

<?php
  
    $configs = array(
            array(
                    'probability' => 60,
                    'message' => '60%の確率で表示されます。'
            ),
            array(
                    'probability' => 30,
                    'message' => '30%の確率で表示されます。'
            ),
            array(
                    'probability' => 10,
                    'message' => '10%の確率で表示されます。'
            )
    );
  
    $count = count($configs);
    $max = 0;
  
    for ($i = 0; $i < $count; $i++) {
        $max += $configs[$i]['probability'];
    }
  
    $rand = rand(1, $max);
    $from = 0;
    $to = 0;
    $result = '';
  
    for ($i = 0; $i < $count; $i++) {
        $from = $to;
        $to += $configs[$i]['probability'];
  
        if ($from < $rand && $rand <= $to) {
            $result = $configs[$i]['message'];
        }
    }
  
    echo $result;

解説

probabilityの数値が大きいものを高確率で出しています。
数値の合計が100を超えたとしても数値の大きいものが出力されます。

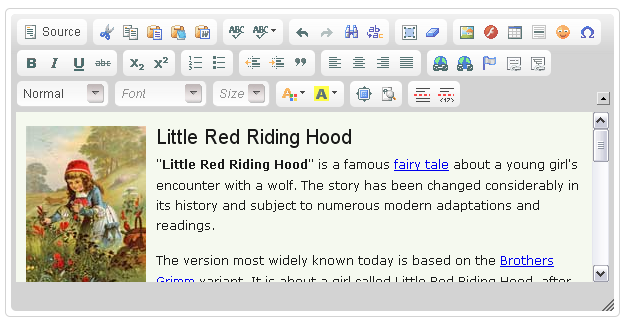
CKeditor、CKfinder実装

ここではサイトの更新時に役立つCKeditor、CKfinderの紹介をします。

ckeditor

CKeditorのデモはこちら
https://office-goto.info/demo/ckeditor/

CKeditorのダウンロード
http://ckeditor.com/
CKfinderのダウンロード
http://cksource.com/ckfinder

CKeditor、CKfinderの実装

head

<script src="ckeditor/ckeditor.js"></script>
<script src="ckfinder/ckfinder.js"></script>

ckeditor.jsとckfinder.jsを読み込んでください。

html

<textarea id="eventContents" name="eventContents"></textarea>

textareaタグでid、nameをターゲット指定してください。

改行 Enterでbrタグを指定する

デフォルトでEnter改行するとpタグが、Shift+Enterならbrタグが挿入されるので、これを
Enter改行ならbr、Shift+Enterならpタグに変更します。
ckeditor/config.js

CKEDITOR.editorConfig = function( config ) {
    // Enterキー押下時のタグ
    CKEDITOR.config.enterMode = CKEDITOR.ENTER_BR;
    // Shift+Enter押下時のタグ
    CKEDITOR.config.shiftEnterMode = CKEDITOR.ENTER_P;
};

idでツールバーや幅、高さを指定

<script type="text/javascript">
var editor = CKEDITOR.replace( 'eventContents',{
    width  : '500px',
    height : '300px',
    toolbar: [
                ['Source','Bold','Italic','Underline','Strike','-','Subscript','Superscript']
                ,['NumberedList','BulletedList','-','Outdent','Indent','Blockquote']
                ,['JustifyLeft','JustifyCenter','JustifyRight','JustifyBlock'],'/'
                ,['Link','Unlink','Anchor']
                ,['FontSize']
                ,['TextColor','BGColor']
                ,['ShowBlocks','Maximize','About']
            ]
});
    // CKfinder設定
    CKFinder.setupCKEditor(editor, 'app/js/library/ckfinder/');
</script>

body内の一番最後に記述してください。
これでidごとにツールバーなどを変えてCKeditorを複数実装できます。

細かな設定がいらない場合

<textarea class="ckeditor"></textarea>

Javascriptを書かなくてもclass指定で実装できます。

idから要素を取得

var bar = CKEDITOR.instances.eventContents.getData();

jQueryの$(‘#eventContents’).val();では内容は取れてこないので注意が必要です。

CKfinderでファイルのアップロード

/ckfinder/config.phpを編集します。
function CheckAuthentication()内の
return false;を
return true;に書き換えます。

$baseUrl = ”;
をファイルのアップロード先に変更すれば設定完了です。

PHP 比率を保ち画像リサイズ

ここでは画像比率を保ちPHPで画像のリサイズを行います。

1.画像ファイル名はランダム
2.メイン画像 (横:700 高さ:比率を保ちリサイズ)
3.サムネイル作成(縦長:横216 横長:高さ163)
4.smart_resize_image.phpライブラリを使用

サンプルソース

require_once("smart_resize_image.php");
     
/**
 * 画像アップロード
 * @param  $tmp
 * @param  $mainPath
 * @param  $thumPath
 * @return boolean|$fileName
 */
public function upImage($tmp, $mainPath, $thumPath){
    $fileName = md5(uniqid(rand(), true));
    $fileName .= '.'.substr(strrchr($tmp['name'], '.'), 1);
    $mainPath .= $fileName;
    $thumPath .= $fileName;
    if (!move_uploaded_file($tmp['tmp_name'], $mainPath)) {
        return false;
    }
    $arrSize = getimagesize($mainPath);
    $width = $arrSize[0];
    $height = $arrSize[1];
    if ($width != 700) {
        $num = 700 * $height / $width;
        $rheight = floor($num);
        smart_resize_image($mainPath, 700, $rheight, false, 'file', true);
    }
  
    copy($mainPath, $thumPath);
    // サムネイル
    $arrSize = getimagesize($thumPath);
    $width = $arrSize[0];
    $height = $arrSize[1];
    if ($width < $height) {
        $num = 216 * $height / $width;
        $rheight = floor($num);
        smart_resize_image($thumPath, 216, $rheight, false, 'file', true);
    }
    else {
        $num = 163 * $width / $height;
        $rwidth = floor($num);
        smart_resize_image($thumPath, $rwidth, 163, false, 'file', true);
    }
    return $fileName;
}

解説

ランダムのファイル名
$fileName = md5(uniqid(rand(), true));

画像の拡張子を取得
$fileName .= ‘.’.substr(strrchr($tmpName, ‘.’), 1);

加工する画像のサイズを取得
$arrSize = getimagesize($mainPath);
横  $arrSize[0];
高さ $arrSize[1];